Sunday 27 March 2011

Leeds Loves Creativity (Colour Pallet)

After finally getting to a stage with the type and the image as i want them. I had to experiment with the colour pallet. In the PDF sent out, they had a suggested colour pallet (which they had been using for the majority of their current identities). However in the PDF they said feel free to bring in your own colour pallet.
Below i have experimented with several colours. It is key to know, on a colour backdrop, the areas in black (including the type) will be white, minus the word 'Creativity). The colours below, although common work well with the design, and the blue inparticular, really lifts out.
The blue was a suggested tone, which i changed ever so slightly to make it brighter and less dull, because i wanted the piece to be bright and fun, much like the creative community.
Next stage - The final boards.

Leeds Loves Creativity (Type and Logo Dev)

As mentioned in the previous post - the type was an issue at that stage, however i was set in using a paint brush as my focus image (pictogram). The existing range of logos for 'Leeds Loves' are very minimal, lack of detail in the imagery and a limited colour pallet.
The designs below have pushed the detail in the image to a strong point, although i am still unsure this would be appropriate - as mentioned the other logos do not include much detail.
Saying that, here they are, and i must admit, i do like them. The details i added include the paint dripping from the brush, and the type broken down a little bit, just to add some creativity to the design. I sat the type outside of the image, and i feel this works better for the design, but it is still not at its final point as of yet.


Leeds Loves Creativity (Logo Development)

The Leeds Love brief is interesting. Although at first it seems you have a lot of freedom in terms of design, the reality is, your restricted with colour pallet, imagery and typeface. Looking throught the brand guidelines PDF sent out - it was obvious to me rite away that the pictorgram was the focus of the design, and had to give the audience some sort of idea what they are looking at. For example the 'Leeds Loves Shopping' indentity is the type set inside a label - simple yet effective design.
Below I have taken my design in the same direction. I wanted an object (tool of the trade) which people would immediatley assosiate with the creative industry. As you have seenn ,my initial concepts were based around digitial art, using a mac as the pictogram. However i did not want 'creativty' to be linked with the digital media as a whole.
The design below show my initial concepts in a digital form, without the use of colour at this stage. Because the existing identitys hold the type inside the image, i was scared to go away from this technique, although it seems to make the piece stronger, and that little bit more creative when i do so.

I liked the idea of using a pencil as the image, as most great art start with pencil / pen to paper. Although i found the design left a lot of white space, which you do not see with the other designs. The paint brush seemed a stronger direction, although i feel the location of the type needs to be experimented with.


Thursday 17 March 2011

Yearbook - Stock

Obviously the choice of stock was a fundamental and costly option for the yearbook budget. After contacting the printers (Duffield) of Leeds. We spoke to Clive Elston, who gave us great advice and guidance for choosing the stock and explained the print processes in great depth to us.
We showed Clive the pantone colours we had so far selected, and were immediatley told that the orange (when printed) would not match the Papago Tangerine stock we had selected, if we were to get close to this stock, we would have to printed the yearbook using the CMYK processes plus a spot colour, which would make the printing more expensive. Least to say, this is a problem.


Tuesday 15 March 2011

Yearbook - Pacing Sheet

As a requirement for the next yearbook meeting, we were asked to produce a pacing sheet - which demonstrates the layout of the publications spreads, in a flat none detailed form. The purpose of the pacing sheet is to inform the viewers / clients where images will be placed, the colour of the back-drop and extra details including the placement of our visiting professionals pages, student pages, class shot etc.
The first pacing sheet has a key, which informs you of the stock choices, along with the swatch colours that will be given to the printers, once the printing stage arrises. Issues that we have addressed include using the pantone orange for the student DPS's. We have decided against this idea, as it may drown out the colour in some of the students work, and draw the viewers attention away from what is on the page.
On the last pacing sheet, we have shown the concept for a triple gate fold, which will be placed on the inside cover of the publication. We have already received a quote from the printers, and this concept is within our budget.


Monday 14 March 2011

Boost - Experimenting with the Logo

The tutorial with Lorenzo was extremely helpful. I went prepared with several questions concering each brief. For the Boost re-brand, i needed to know how to test my logos, and his answer was simple, print the logo, while experimenting with the colour pallet, stick it on the can (using the Golden Third rule) and photograph it to see how it comes out.
Below i have taken one of my developed identities and experimented with limited colour pallets for each.
At this stage, im pretty pleased with the identity - i feel it works well on the can, and is different from all its current rivals products and logos. Although these design use minimal colour, i am still getting a better impression for how the design is developing.

Sunday 13 March 2011

Boost - Final Logo

After all the experimentation with colour etc so far, I have decided this is the best logo I have developed, and this is the design I will be using in the developing stages of this brief.
Its clean, bold, fun and unique. The typeface is hand rendered and the 3d backdrop adds impact to the design. These are the details which can be changed in terms of colour pallet and scale.

Saturday 12 March 2011

EOYS - Type Dev

After the initial stages of choosing a typeface to work with etc, i finally found one that i felt represented my concept, and communicated the tone of voice effectively.
Again working with the strapline - as this will be the main point of focus and recognition for the show, i experimented with different techniques on illustrator to make a more unique identity.
I had the idea i wanted the colour to be made up of a gradient which could (potentially) fade into the backdrop colour. Further to this, i started using lines to break up the text, and make (as mentioned) a unique identity for this end of year show, I wanted the strapline to be produced in a 'better way' to relate to the strap line - apposed to standard serif typeface titles.

And this is where the design has come too. Where the title can be placed on its own, or each word in a rectangle, again to add another design technique to the process. The design has come out well, the lines break up the heavy type, and yet the rectangle makes it that bit stronger and more eye-catching to passers-by.

Friday 11 March 2011

EOYS - Type Selection

After coming up with an inital concept, it was time to go through fontbook and select typefaces which i felt carried the tone of voice that i wanted to communicate with to the audience.
Below are several fonts which i narrowed my selection down too. The majority of them are serifs, which are easier to read at this point size. The weight of the letterforms are essential also, i want the type to be legiable at a large scale, and at smaller point sizes like 8 - 10pt.
The strapline: There's a way to do it better - will be the focus point across a range of media, including promotional material and in-uni guides etc.

EOYS - Research

Caledonian Creates - 2008 (GreigAnderson)


EOYS - Research

Chopin In The City


Thursday 10 March 2011

Yearbook - Route 1 (Mock-Up)

For our upcoming Yearbook Meeting with the tutors, we agreed to produce a too-scale mock-up of several DPS's to be included in the yearbook. This was so the tutors could get a feel for the look, legiabilty, colour pallet and layout of the publication.
In the mock-up we included:

  • Contents page
  • 2 examples of student DPS
  • A tutors quote DPS
  • Visting professionals DPS
We met the deadline and although some patches of the mock-up were a bit haggard, its still served its purpose on the day. From this point we need to look into stock choices and costings.


Boost - The Third Rule

After a tutorial yesterday with Lorenzo, he told me about the golden third of a can. He told me this is where the fundamental part of the design must be, as thats how the can is stacked on the shelf, with the logo facing outwards. I had a general idea that the logo had to be placed in a certain section, but it seems its essential the majorty if not all of the logo must be kept inside the 1st third.
The image below of the current Boost can, show a simple layout showing how the golden third would appear on the shelf. Interestingly, the current Boost logo sits off from this golden area, and because of this it is not legiable to potential customers rite away - a mistake i will not make.

Wednesday 9 March 2011

Boost - Logo Development

This post is to show how the development of the Boost re-brand is coming along. Because the brief allows the designer to choose their tone of voice and target audience - my design has taken form to target 16+ Year olds, both males and females. Although i have already looked into the existing colour pallets and bottle / can artwork that Boost currently uses for their range, i do not feel i am at the point to start the range artwork. The logo is in its final stages and now i feel once this has been completed, the colour pallet can be seen too.


Boost - Current Flavours and Logos

With the logo developing well, i decided it was time to go onto the Boost website to look at current range of flavours and bottles/cans which were being distributed.
I was immediatley struck by the range of their products, being honest i thought they had 2 flavours of beverage to their name. Although this did shock it, it also made me feel more confident in the direction i should take the logo, to work across the range of products.

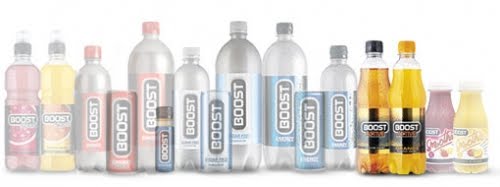
Boost Sport - The design includes photographed fruit, the standard logo horizontally placed apposed to vertical like some of the other products.


Boost energy (+Cola) - In this range, there are cans, medium and large bottles. There are two flavours, original and cola. The logo is placed vertically with minimal design in terms of colour pallet or imagery.


Boost Active - Much like the Active range, 2 bottle, 2 flavours, logo placed horizontally and a little bit more effort in terms of design, but still not good enough to stand out amongst its rivals.


Boost Smoothie - My favorite of the range, small and well designed. Again the logo is placed horizontally and the imagery is very professional and gives the audience the immediate message of a smoothie.


All in all, i feel Boost is letting itself down in terms of being professional, and standing out from the rest of its rival products like Red Bull and Monster.

Yearbook - Route 1

As mentioned in a previous post, we will be producing 3 routes to present to our client to show the directions which the yearbook could be taken in. Below is 'Route 1' this is what we consider the safe option, which does not push any limits in terms of design and keeps with the original pitched concept - 3.
The front cover will be a flat matt print with the '3' in a black spot varnish.
The spreads below demonstrate the use of the colour pallet in terms of background colour, type and how they work with the imagery. After many experimental spreads it was decided that we would not use the orange for any of the student DPS's. These would be either black and/or white.
We kept the gutter at the bottom of the design to carry the flow of information, however this can change occasionally to the top of the spread, depending on imagery, quotes etc.
Included in the example spreads below is the visiting professionals DPS. Please excuse the pixelated image for the time being, but on the spread you get the feel on how we will be pushing the quote to the viewers attention, while maintaining the gutter at the bottom of the spread to give further information.


Yearbook - Mark Howe (Photography)

Another concept to include in one of our yearbook routes, was this centre spread which would feature every student on the GD course in 3rd year. The spread below (produced by Alex Walter) for the yearbook, demonstrates the concept very well. There are 44 students to be included and the example below shows 54 people. We feel this will be a unique spread for a yearbook - and because we are not having individual student pictures on each spread, this would be a perfect, fun balance.
Mark Howe is the photographer we have brought in to photograph both the student works, and this spread below (fingers crossed). Mark seemed very impressed with this concept and seemed excited to get started.
The following 2 images show some of Mark's portrait photography. He spoke about how he could include the concept of 3 in the photography side of yearbook, possibly by using 3 lights in the photo-shoot, and unseen but fundamental detail to the design which makes the concept that bit stronger.
Both myself and the rest of the team are looking forward to working with Mark, he was more than happy to share concepts and keep us thinking about how this publication will be seen by viewers who do not understand or know of the 3 concept.